Friday, September 3, 2010

Craft apron - I finally have one!!


Yes...I am ashamed to say that until now I didn't own an apron for crafting. Recently I have been working several projects. I've been painting a lot and using all kinds of gooey materials and finally got tired of getting paint all over my clothes so at last made myself a craft apron.

I know, I know.... some may think the fabric I used is pretty BLAH. It was not my first choice, originally I was going to use a really cute "sewing and crafting" themed fabric but I thought better of it. I figured I was going to be using this apron for dirty jobs and did not really want to waste some pretty fabric just to mess it up so I compromised...I used the plain fabric but added the red trim and cherry pockets. I think it turned out pretty cute if I may say so myself!

Storage Rack


I found this pot rack at a Goodwill store (brand new YAY!) It occurred to me that it would be perfect to hand over my work table. It allows me to have tools and materials and arms length but totally out of the way.

I did need to make a cover (with fabric found at the thrift store) to prevent smaller items I placed in there from falling through. It works perfectly and I LOVE IT!

Tuesday, August 31, 2010

First cloth and clay dolls - Day 5-6


I've made not made as much progress with my dolls asI tho ugh I would. This is because a friend of mine and I had been talking about doing some altered suitcases. After searching the thrift stores in the area we finally found a couple of great suitcases (mine is red her's is green). We worked a bit on them this weekend. I will post all that when we are done decorating them.

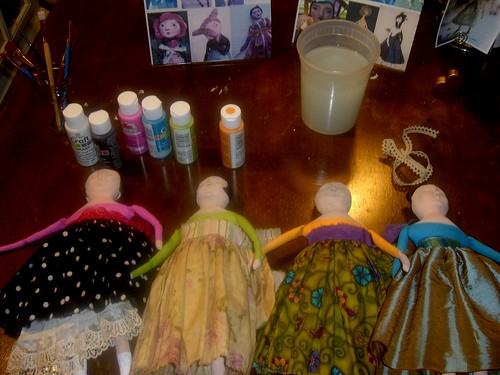
Anyway, back to the dolls. I did make some progress on them. I painted their tops and they are done. The skirts are done as well and ready to be attached. I will do this as soon as I am done with all the painting so I don't get paint on them accidentally.

The first coat of skin color has been applied. For the first coat I used the same base color for all of them. For the second coat (and 3rd if needed) I will give them different skin colors. Then I will work on their faces and give them their personalities.

Three out of the four dolls have clay sculpted hair which will be painted in different colors (not sure what those will be yet). On the forth one I will use some kind of fiber for her hair. However, before I start working on the above, I will fist finish their legs (socks and shoes) and arms/hands. More to come! ...

Wednesday, August 25, 2010

Altered mermaid - Finished


Finished Paper doll mermaid.


I used sequins, beads, shells, ink and color pencils to decorate this doll.

Tuesday, August 24, 2010

Altered mermaid - in progress


Yesterday while I waited for my cloth and clay dolls to dry I started working on this project. It is Mermaid paper doll for a swap in swap-bot. She is coming out really cute...I think I might keep her and make a new one for the swap...LOL.

Anyway...while this little lady dries, I am off to choose the skirt fabrics for my cloth and clay dolls....see you soon!

First cloth and clay dolls-Day 3-4


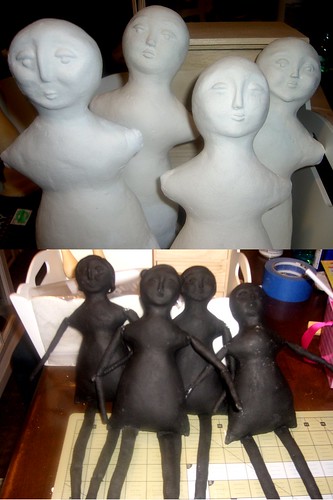
Saturday I did the sculpting of their faces and yesterday I applied the black paint coat. Now they just need a little touch up to the base coat and they are ready to be painted but before I do that I will start working on their squirts.

Monday, August 16, 2010

cloth and clay dolls - progress


Well...I guess it's about time I blog something on here....I have been busy getting my craft room in organized and in shape to wonk in it with ease.

So..... now that everything has found a home, I have finally been able to start working on an online class I bought in mid June. "The Original Cloth and Clay Doll". This is a type of prim doll.

I've decided to be ambitious and make four dolls at the same time. I figure I will get lots more practice this way. We'll see...

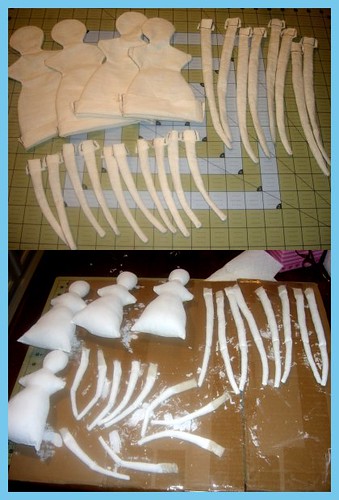
In the first picture you can see I have sewn, cut and turned all the doll pieces. In he second picture I have stuffed all the bodies and limbs and have given them the coating of gesso. Now I will need to wait until it dries so I can continue to apply the first layer of clay....tap tap tap....

Come back again soon. I will keep posting on the progress I make with these little ladies :)

Friday, July 30, 2010

Studio - (another) Makeover


Since my last post, I have done a bit of reorganizing in my studio. I have been rethinking my space and have been moving stuff around. As usual, I've visited the local thrift stores and found a couple of cabinets and shelves(modular used mainly for closet organization) and lucky me, they were the same color of some I already had. So now I have put them next to my desk. I was planning to put shelves in this area but I figured I already have some on top. I decided to use the modular cabinets because they have drawers and doors which looks neater.

Last week I tried to install the other half of my L-shaped wall shelves but I had cut them too long and a little crooked because I used a jigsaw. That's what happens when you don't have the right tools. I did get me a circular saw this week. I hope It will do a better job and I can get the shelves finally installed.

Tuesday, July 13, 2010

My Creative Space - Where did the light go??

Why would anyone want a nice uncomplicated life right? In my last post regarding this subject (My Creative Space) I know I said I was almost done but then, yesterday, the more I looked at the workspace/desk area the more I realized that although it was a huge (11'x4') working space, it was not very practical. When I first created it, it served it's purpose because I needed a large enough area to work in and to keep two computers so I put together one massive surface which took up the whole wall. (Did I mention I was on a very tight budget?). I created the surface using scraps of material I had which did not make for a very even surface. As I said, it did serve it's purpose at the time. However, now that I do not have a need for two computers, I do not need such a large desk.

Some of the inconveniences of such a large area are:
  • It always ends up being a catch all area and becomes a catch all surface instead of a workspace.
  • Because I made it so wide and it only had minimal support underneath, it made it impossible for me to finish installing the other part of the corner shelves I've had cut for months and waiting to be put up.
  • Because I used call brackets to attach it and support it, it was very hard to work with the numerous cables I constantly need to plug and unplug.
  • Because the surface was put together using several pieces of wood, the surface was not even and smooth so I needed to figure out how to create that smooth and even surface (which I still never figured out how to do inexpensively).
  • I had no functional drawers for office supplies and filling. Everything ended up "ON" the desk. cluttering it.
Some of the conveniences are:
  • It is a large area to work on (once it's been made smooth, even and uncluttered)
  • Ability to keep all your tools and materials at hand (when it's uncluttered)
  • It was cheaply made (and it showed)
After having my studio organized for a whole three days, I could not take so much organization and order so, yesterday, while my husband and I brainstormed try to come up with a solution for the uneven surface, it occurred to me...HEYYYYY...how about if I just find a desk with drawers at Goodwill or a thrift store! I can use that for the computer area. On the other side, for additional workspace, I can use a good size rolling table I already own. And if I need it, I can always get a shelf!

This morning, bright and early I headed to the Goodwills in the area to find me a desk. I did find one at the third store I visited, bought it and brought it home.


I took apart the old workspace/desk and my clean and organized room now is a war zone AGAIN....*sigh*

Hurricane Lily was here....


Sunday, July 11, 2010

Found Object Robot Assemblage Sculpture


Turner By Brian Marshall

For a very long time I have been enjoying Brian Marshall's creativity. He makes the most amazing and clever Robots assembled from found objects. I definitely recommend taking a tour of Brian's Flickr (just click on the image) and if you MUST have one of his bots you can find his shop on Etsy.

My Creative Space - I can see the light!


This week I got really inspired and I have organized and cleaned most of my work areas. For the most part everything is where it should be but I am sure I will still make some changes and adjustments as I figure out the most convenient place for tools and materials.


Since taking this picture a couple of days ago I have managed to organize my desk.


I still have some small organization projects to finish in this room:
  • Install the other side of the corner shelves above my desk
  • Finish desk surface
  • Attach corks to the edge of the shelves. This will be used instead of a bulletin board. I got the idea from the Do It Yourself Magazine as seen HERE
  • Organize my dolls in the curio cabinet
  • Install some storage shelves in the bathroom
  • Organize my workshop area
  • Determine what to hang in the wall next to the bathroom. I will probably use this area for a bulletin board when I can hang more dotees and knick-knacks as the one above the sewing area is full to capacity
Maybe , while I do my online clay and cloth doll class I will have some time to tackle this projects :)

Saturday, July 10, 2010

My Creative Space - Work in progress


Soon after moving into our house, I had to put a makeshift office together because when I came to Georgia I continued to work as a contractor for my old employer and needed to get to work right away. This did not allow me to slowly put the room together as I would have liked so for the past year I have been working to make this the perfect work area. Of course, this is still a work in progress and on a tight budget. Since I love shopping for bargains I specially enjoy browsing though thrift and antique stores for that great deal! I so enjoy collecting wonderful and useful items.

My Creative Space - The beginning

This project has been a long time coming. It is still a work in progress (is it possible to be ever done?). It all started last year when I got married, and I told my husband I had two conditions. One he had to buy me a GPS. I still venture out and with out it I would never find my way home! The second was that I HAD to have a craft room when we bought a house...and of course, my wishes are his command. I must say, my hubby hubby is a very smart man and one of the numerous reasons I love him! Soooo...to make a long story short, I got my wish, we bought a house and I got a WHOLE ROOM for my crafts (a dream come true!) Before - Front The room is in the basement and although I was no crazy about it because of the weird shape and lack of light, it is the room that makes the most sense. The bathroom is in this room, it has a door leading to the yard. Before - Back AND...did I mention I got a BONUS work room? YESSSSS! Before - workshop area

Disclosure Statement

This policy is valid from 10 July 2010

Although I've just started my blog and this is not necessary yet, I want to get it out of the way. This statement has been created according to my conditions at this time. Should these change, this statement will be revised.

This blog is a personal blog written and edited by me. For questions about this blog, please contact craftylily at gmail.com.

This blog does not accept any form of advertising, sponsorship, or paid insertions. We write for our own purposes. However, we may be influenced by our background, occupation, religion, political affiliation or experience.

Should I come across any websites or blogs that I find of interest, I will pst a link. However, at this time I will not be receiving any compensation for the link. A link back would be appreciated but not obligatory.

The owner(s) of this blog is not compensated to provide opinion on products, services, websites and various other topics. The views and opinions expressed on this blog are purely the blog owners. If we claim or appear to be experts on a certain topic or product or service area, we will only endorse products or services that we believe, based on our expertise, are worthy of such endorsement. Any product claim, statistic, quote or other representation about a product or service should be verified with the manufacturer or provider.

This blog does not contain any content which might present a conflict of interest as far as I am aware.

If at any time I accidentally use a copyrighted image that you own and feel I have used improperly, please contact me and I will be happy to remove it.

To get your own policy, go to:


Friday, July 9, 2010

Taking the (blog) plunge....why?

blog-or-not
There are several reasons why I’ve decided to start this blog. As I have traveled through the wonderful world of the internet, I have found lots of information. There are so many generous people who share their expertise and experience through their blogs. Here are some of those reasons:
- To share information and knowledge with and from others. Hopefully I will have followers soon and I can share ideas and get feedback from others. Creative criticism is always welcomed!
- One of the main reasons I have hesitated to blog is my writing skills. English is my second language and I’ve never felt that writing is my forte. This will allow me to practice and hopefully get better at it.
- Art and crafts have always been a big part of my life. I hope to journal my journey.
- I would like to possibly turn this love for creating into a business.
- I hope this will inspire me to I continue creating.